
Check local zoning before buying
Before you order a beehive starter kit, you need to verify the specific municipal and county regulations that apply to your property. Beekeeping is subject to local ordinances that vary significantly by jurisdiction, and ignoring these rules can result in fines, forced removal of your hives, or legal disputes with neighbors.
Most cities and counties regulate beekeeping through zoning codes that dictate where hives can be placed on a property. Common restrictions include minimum lot sizes, limits on the number of colonies allowed per acre, and mandatory setback distances from property lines and adjacent dwellings. Setback requirements often range from 10 to 50 feet, ensuring that bees do not directly overfly neighboring yards or public sidewalks. Some jurisdictions also require that hives be positioned so that bees fly above a certain height (e.g., six feet) before leaving the property, often achieved by installing a fence or tall hedge as a "flight barrier."
Beyond city codes, you must check for Homeowners Association (HOA) rules or deed restrictions. Many HOAs explicitly prohibit apiaries or impose stricter standards than local law. Even if your city allows beekeeping, an HOA violation can lead to significant penalties or forced removal of equipment. Additionally, some rural counties may have agricultural exemptions that limit liability or zoning restrictions, but these often require formal registration with the county clerk or department of agriculture.
To find the correct regulations, contact your local city planning department, county zoning office, or agricultural extension service. Ask specifically about:
- Maximum number of hives allowed per residential lot.
- Required setback distances from property lines and structures.
- Requirements for flight barriers or fencing.
- HOA or covenants that may override local permissions.
Once you have confirmed that your property is compliant, you can proceed with purchasing your starter kit with confidence. This step prevents the costly mistake of buying equipment that you cannot legally use.
Compare hive styles for natural methods
Choosing a hive structure determines how closely you can adhere to natural beekeeping principles, such as minimal intervention and comb-free harvesting. The three primary styles—Langstroth, Top-Bar, and Warre—offer distinct trade-offs between yield, labor, and philosophical alignment with bee biology.
| Feature | Langstroth | Top-Bar | Warre |
|---|---|---|---|
| Comb Structure | Standardized foundation sheets | Unfettered, irregular comb | Natural comb, vertical growth |
| Inspection Style | Vertical, frame-by-frame | Horizontal, top-access | Bottom-up, minimal disturbance |
| Harvest Method | Extractor (comb destroyed) | Comb removal (comb destroyed) | Comb cutting (comb replaced) |
| Labor Intensity | High (heavy lifting) | Low (lightweight, top-access) | Low (no heavy lifting) |
| Natural Alignment | Low (artificial foundation) | High (free-form comb) | High (natural comb) |
Langstroth Hives
The Langstroth hive remains the industry standard, utilizing stacked boxes and standardized frames. While efficient for large-scale honey production, it requires artificial foundation sheets that restrict natural comb construction. Harvesting involves removing frames and extracting honey through centrifugal force, which destroys the comb each time. This method prioritizes human accessibility over minimal bee disturbance, making it less suitable for strict natural beekeeping philosophies.
Top-Bar Hives
Top-bar hives are horizontal boxes where bees build comb from hanging bars without foundation. This allows for natural comb architecture, which some beekeepers believe supports healthier bee development. Inspections are less invasive, as the beekeeper lifts only the top bars rather than heavy vertical boxes. However, harvesting still requires cutting the comb from the bars, meaning the wax structure is not preserved for the bees.
Warre Hives
The Warre hive is designed to mimic the natural vertical growth of bees in tree cavities. Bees build natural comb from the top down, and the beekeeper adds empty boxes at the bottom to provide space. This "bottom-up" approach minimizes disturbance, as the beekeeper rarely inspects the brood nest. Harvesting involves cutting the topmost comb, which is then replaced with empty frames or boxes. This method aligns most closely with natural beekeeping principles, emphasizing minimal intervention and natural comb.
Legal and Local Considerations
This is not legal advice. Beekeeping regulations vary significantly by jurisdiction. Before purchasing any hive style, verify local zoning laws, homeowner association rules, and state apiary regulations. Some areas restrict hive types or require registration. Always consult your local agricultural extension office or beekeeping association for current legal requirements.
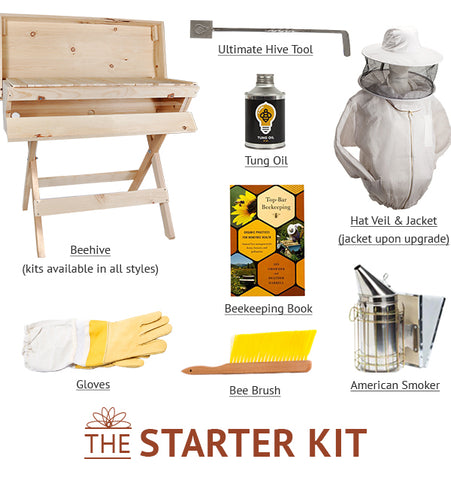
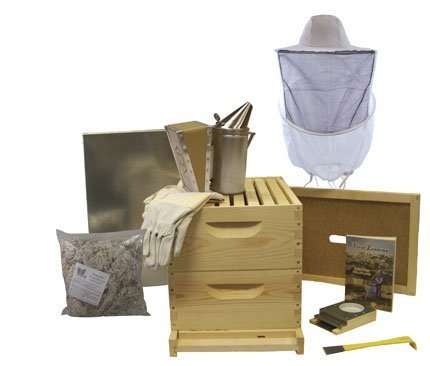
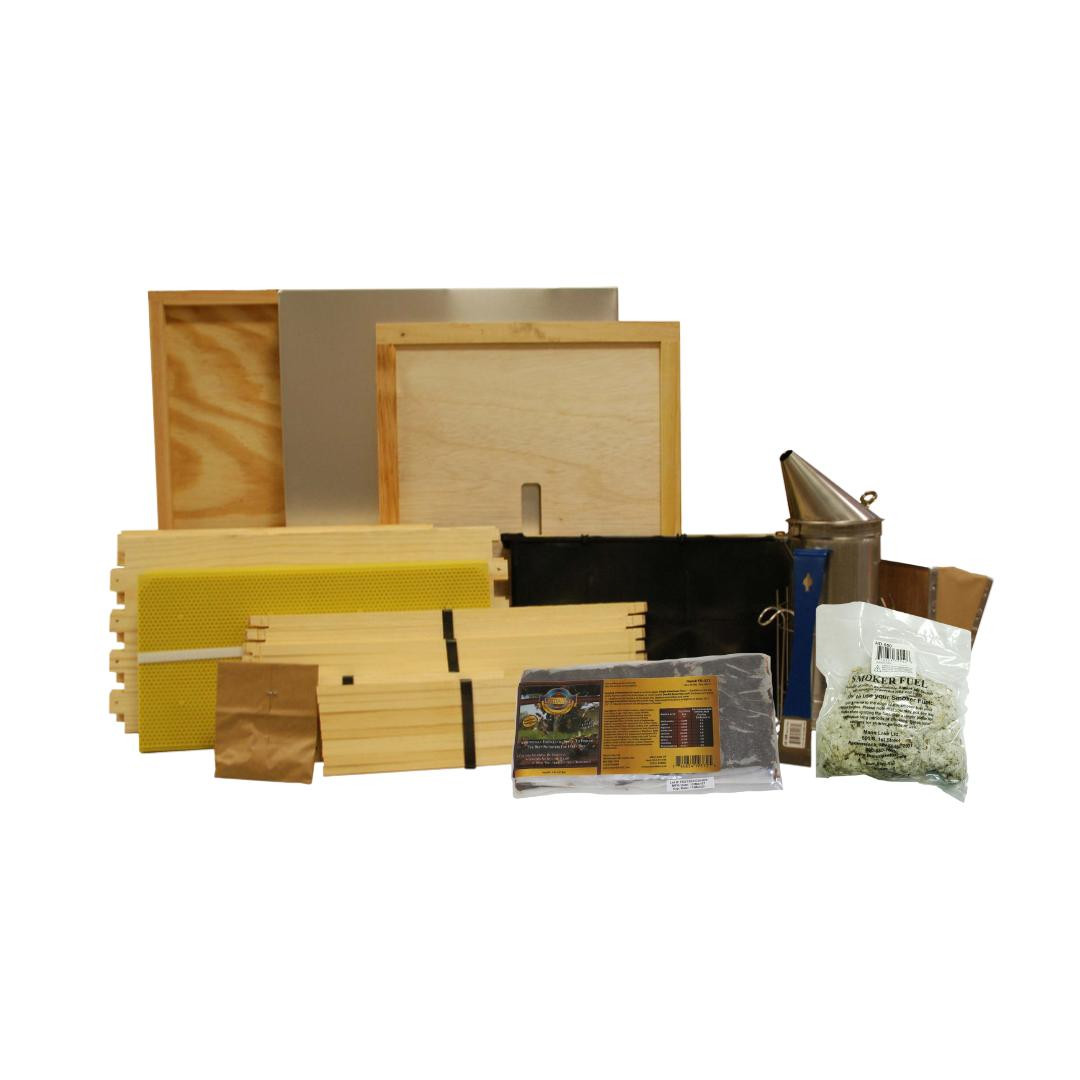
Essential gear included in kits
Beekeeping starter kits generally fall into two categories: unassembled DIY kits and pre-assembled bundles. Unassembled kits require the beekeeper to construct the hive boxes, providing a basic understanding of hive architecture but demanding time and tools for assembly. Pre-assembled kits offer convenience, with frames, foundation, and covers already installed, allowing for quicker deployment. Both types aim to provide the core infrastructure needed for a functional apiary.
A complete beginner kit typically includes the following components:
- Hive Body: The main box where the colony lives.
- Frames and Foundation: Wooden or plastic frames with wax or plastic foundation sheets to guide comb building.
- Covers: Inner and outer covers to protect the hive from weather.
- Base: A floor board, often with an entrance reducer.
- Protective Gear: Veil, gloves, and often a suit or jacket.
- Tools: Hive tool for prying boxes and smoker for calming bees.
The distinction between these kits affects the initial learning curve. Unassembled kits are often cheaper but require woodworking skills or access to tools. Pre-assembled kits cost more but reduce the barrier to entry for those focused solely on beekeeping rather than carpentry.
It is important to verify what is included in any specific kit. Some manufacturers sell bare hives without frames or foundation, while others include protective gear. Always check the product description for a detailed inventory list. This ensures you have all necessary items before the bees arrive.
-
Hive body and boxes
-
Frames and foundation
-
Inner and outer covers
-
Hive tool
-
Smoker
-
Protective veil and gloves
Understanding the 3 feet 3 miles rule
When you first unpack your beehive starter kit and settle the hive body onto the stand, the colony establishes a mental map of its immediate surroundings. Foraging bees learn the visual landmarks around the entrance to navigate back to the hive. This spatial orientation is fragile. If you move the hive even a few feet, the returning foragers will still fly to the original location. They will circle the empty spot, confused, often leading to the loss of those workers or, worse, robbing by bees from neighboring hives.
To avoid this disorientation, beekeepers follow the "3 feet 3 miles rule." This principle offers two distinct options for relocating a hive. You can move it less than three feet, a distance short enough that foragers can visually adjust their flight path and find the new entrance. Alternatively, you can move it more than three miles, placing the hive outside the typical foraging range of the local bee population. At this distance, the bees cannot recognize the old location, so they accept the new site as their home.
This rule is a logistical guideline for colony management, not a legal requirement. While it is not legal advice, you must verify local laws and zoning ordinances regarding beekeeping in your area. Some municipalities have specific setback requirements or restrictions on hive placement that may conflict with your desired location. Always check with your county or city clerk before installing hives.
For beginners, the three-foot rule is the most practical approach. It allows you to rearrange your apiary layout without losing bees. Move the hive only a few feet at a time, or cover it with a tarp for a day to force the bees to reorient. The three-mile move is generally reserved for permanent relocation or preventing disease spread. Understanding this rule helps you retain your colony’s workforce and keeps your starter kit operation stable.
Timeline for hive assembly and arrival
Assembling a starter kit and timing the arrival of your bees requires a structured approach to ensure the colony establishes itself before winter. This process involves preparing the physical hive, allowing materials to cure, and coordinating with suppliers to align with local nectar flows. Note that this timeline is a general guide; you must verify specific local regulations regarding hive placement, registration, and inspection schedules with your county agricultural office or state apiary inspector.
Unbox your kit and assemble the boxes. If you are painting or staining the wood, apply two coats of exterior-grade latex paint. Allow the paint to cure fully for at least two weeks before introducing bees. This prevents chemical fumes from harming the colony and ensures the wood is dry to the touch.
Contact your state beekeeping association or local extension office to confirm registration requirements. Many states require annual hive registration by a specific date, often in the spring. File any necessary notices regarding hive location or neighbor notifications as mandated by your jurisdiction. This step is critical for compliance and does not constitute legal advice.
Order your package of bees or nucleus colony from a reputable supplier. Most suppliers require advance notice for spring shipments. Request a tentative delivery date that aligns with your local forage bloom, typically when fruit trees or early wildflowers are in full bloom. Confirm the supplier’s shipping policies and any health certifications required for your state.
Receive your bees when the weather forecast shows mild temperatures (above 50°F/10°C) and calm winds. Install the package immediately into the cured hive box. Provide a sugar syrup feeder to help the bees build comb and store energy. Monitor the hive closely for the first week to ensure the queen has been released and the colony is accepting her.
This timeline ensures your hive is structurally sound and legally compliant before the bees arrive. Adjust the schedule based on your local climate and the specific lead times of your chosen supplier. Always prioritize the health of the colony by avoiding rushed assembly or premature installation.
Are starter kits worth the cost?
Buying a beehive starter kit often saves time compared to sourcing components individually. Assembled brood and super kits come pre-built with frames, foundation, and covers, which helps beginners avoid the guesswork of selecting compatible parts. This approach is useful if you want to start beekeeping quickly without managing multiple suppliers.
However, kits can be more expensive than buying raw lumber and assembling the hive yourself. If you have woodworking experience, purchasing individual components from suppliers like Mann Lake or Dadant may offer better value. The trade-off is between upfront convenience and long-term cost savings.
What is the 3-3-3 rule?
The 3-3-3 rule is a standard beekeeping principle for moving hives without losing the colony. It states that you must move a hive either less than 3 feet or more than 3 miles. Moving a hive an intermediate distance (3 feet to 3 miles) causes foraging bees to return to the original location, leaving the queen and brood behind.
This rule is essential for hive management and relocation. It ensures the colony remains intact and functional. Always verify local zoning laws before moving hives, as municipal regulations may impose additional restrictions on hive placement and movement.
No comments yet. Be the first to share your thoughts!